
Creating Accessible Content in Drupal
Many Rice websites are built with Drupal. This guide shows how to follow WCAG accessibility best practices when creating and editing content in Drupal.
For help with training, contact the Web Development & Digital Strategy team in the Office of Public Affairs.
Drupal Content Editor Overview
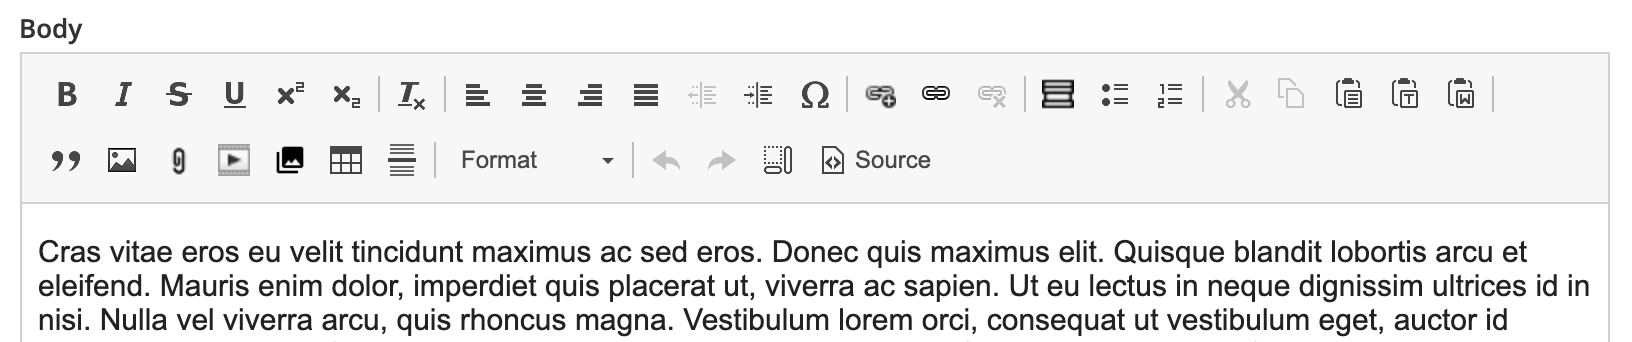
The Drupal editor lets you create accessible content using headings, lists, links, alt text, and more. The Editor "Body" includes a rich WYSIWYG (what you see is what you get) editor. Use the button icons for embedding and applying styles and formats to your content. You can edit visually or in HTML source mode.
Titles and Headings
- Use a unique, descriptive page title — this shows in the browser tab.
- The Hero Title acts as the page's H1. Use only one H1 per page.
- Start with H2s in the body content using the Format dropdown in the Editor.
- Use logical nested order for headings (H2 > H3 > H4). Do not skip heading levels.
Images and Alternative Text
- Alt text is required for images unless they are decorative/hold no meaning. If decorative, then use "" in the description field labeled "alternative text" or in the source code as
alt="". - Alt text should describe purpose and context, not appearance. Avoid “image of...”
- Keep it concise and equivalent (under 125 characters).
Lists and Links
- Use bulleted or numbered lists to organize related items.
- Lists help maintain clarity and readability with steps or options.
- Format hyperlinks with text that clearly and descriptively informs the user what the link will do or go to (e.g., “Read the WCAG Guide” instead of "go here to read more").
Videos
- Captions and transcripts are required for all videos used on Rice webpages.
- Disable autoplay in the "video embed" button and enable responsive layout for mobile access.
Tables
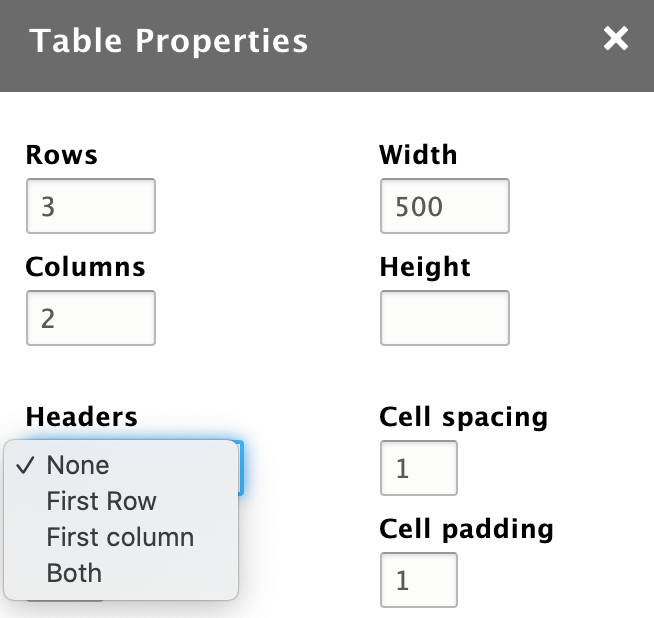
- Use tables only for data, not text layout.
- Use the "Table" button to insert tables. Choose properties like the number of rows and columns and width and height.
- Always use and format the first row as a header row. Select the combo box under the label "Headers," then select “First Row.”
Using CampusPress Blogs to Create Accessible Content
Rice University’s blogs.rice.edu Service blogs.rice.edu is hosted in the cloud by CampusPress, part of EduBlogs’ “WordPress for Education” platform.
CampusPress is designed specifically for education using the WordPress content management system. It offers easy-to-use tools to create student group websites, sites for specific course use, and more.
Faculty, staff, and students can create a website using the blogs.rice.edu site by logging in with their Rice NetID and password. Making the decision to create a website gives the content owner/creator the responsibility of ensuring that everyone can access it equally.
Visit the Complete Guide to WordPress Accessibility to read about accessibility in the CampusPress system.
General CampusPress Accessibility Tips
- Select an accessible theme for the site
- Be very careful of using add-ons, if you aren't sure they are accessible, ask us for help
- Follow the essential practices of accessible design
- Use accessibility automatic review tools WebAIM WAVE and WebAIM Color Contrast Checker to review the site for any issues prior to publishing and any time edits are made
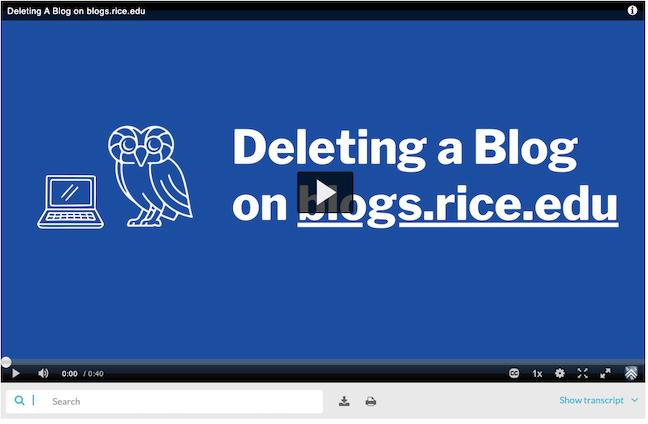
Deleting a CampusPress Blog
Have a site on CampusPress and it is no longer in use or needed? Please consider deleting it.
Watch the short Deleting a Blog video or read through the deletion steps below where we’ll walk through the steps to permanently delete a WordPress blog hosted on blogs.rice.edu using the CampusPress platform.
Deletion Steps
Make sure to log in using your Rice NetID and have administrator access to the site in order to make site-level changes.
- Log in to your WordPress dashboard on blogs.rice.edu.
- Sign in using your Rice NetID credentials.
- Confirm that you are viewing the correct site dashboard.
- From the left-hand menu, select Tools, then choose Delete Site.
- Review the warning message and confirm that you want to permanently delete the site.
- Complete the deletion process by using the confirmation email sent to the address listed in the site settings.
More Resources
For detailed guidance on these best practices, visit: